1.01.2010


12.31.2009
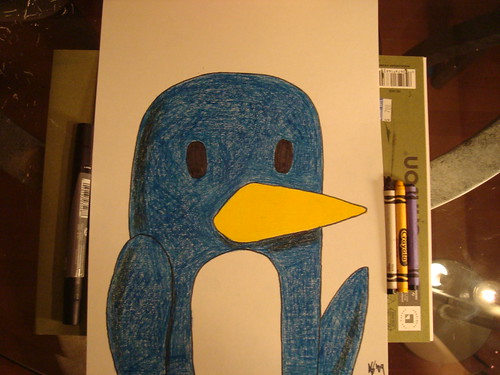
Penguin Interlude
I drew this very quickly (it took about 40 minutes from start to end) for one of my friends. Crayons and art marker.

Again, the paper is white, not yellow. I should really remember to color correct my photos.
Again, the paper is white, not yellow. I should really remember to color correct my photos.
There go the Cats
And the final results for all the linoleum cutting that I did:


This shirt is actually white, not yellowish-tan as seen here. I didn't color correct the image after taking it, and the lights in my house are all really yellow. However, it does look good on that color, so if I ever find a shirt that color I'll be sure to print it.
This shirt is actually white, not yellowish-tan as seen here. I didn't color correct the image after taking it, and the lights in my house are all really yellow. However, it does look good on that color, so if I ever find a shirt that color I'll be sure to print it.
12.29.2009
Here come the Cats.
I did three linoleum prints of the house cat Bartleby. It was both a nightmare and great fun. All of the prints turned out as well as I had hoped.


The three different linos I prepared for the print run.
The three different linos I prepared for the print run.
Present the Third.
I cut this lino after a complete and abysmal failure to screenprint this leaf on a canvas bag. Granted, I could have easily over come the hardships on printing on the bag, but it was early in the morning (for me) and I like lino cutting way too much.

Ta-da!
It's a pretty small lino block, a little bigger than an index card. In addition to how nicely it prints, I just love the look of a freshly carved linoleum block. I kind of think of it as psuedo-sculpture - really, it's more like bas relief. My favorite part of the entire process is simply cutting away at the linoleum. It's just really fun.

In order that I might save myself the hassle and cost of buying many bags and testing the print on those bags, I did test runs of the prints on paper - both Bristol and newsprint. All of my linos turned out well on the Bristol paper. That table is also the area that I did all of my printing on.

Finished product.
And this is how the lino printed on the canvas. Much better than my attempt at screen printing the leaf. I printed the image on both sides of the bag, but felt it was only necessary to show you one side of the bag - I figured you'd get the idea.
Ta-da!
It's a pretty small lino block, a little bigger than an index card. In addition to how nicely it prints, I just love the look of a freshly carved linoleum block. I kind of think of it as psuedo-sculpture - really, it's more like bas relief. My favorite part of the entire process is simply cutting away at the linoleum. It's just really fun.
In order that I might save myself the hassle and cost of buying many bags and testing the print on those bags, I did test runs of the prints on paper - both Bristol and newsprint. All of my linos turned out well on the Bristol paper. That table is also the area that I did all of my printing on.
Finished product.
And this is how the lino printed on the canvas. Much better than my attempt at screen printing the leaf. I printed the image on both sides of the bag, but felt it was only necessary to show you one side of the bag - I figured you'd get the idea.
Present the Second.
This one was really easy to do, since I already had the lino prepared - I used a lino that I had cut for my GID 32 class. This image is probably the second favorite of all the shirt designs I made for GID 32 - the first being the E Coli shirt, which I still need to print for myself.

Wasp on bag action.
I'm thinking that I want to print several more shirts and/or bags with this fella on it. He's awfully popular and I think I could easily sell a few online through Etsy and the like.
Wasp on bag action.
I'm thinking that I want to print several more shirts and/or bags with this fella on it. He's awfully popular and I think I could easily sell a few online through Etsy and the like.
Present the First.
As I may or may not have mentioned in a previous post, I decided to make shirts and bags for most of my friends this year in celebration of the holidays and my new printing skills. At the end of it all, I had printed 4 shirts and 2 bags, which is more than I did for an entire quarter in my GID 32 class. I'm pretty surprised at these results, especially if you consider that I went from concept to product in about a week, a week and a half at most. What took the longest was the linocut carving - I think one particular lino took about three or four hours to cut.
So now we begin the journey through the presents. I didn't record any of the flubs and mistakes I made along the way, but believe you me they exist.
The first present: a screen-printed T-shirt. Printing on black is the bane of my existence. But I did it and I'd do it again, but probably with more success and less frustration.

I drew an ice cream cone on tracing paper for my template.
Cute, isn't it? I think so. Simple, as well. Simplicity is what I like best in my art.

A shot of the screen after I had coated it with screen filler.
Screen filler, as I may have mentioned a few times, is not my favorite product. I can see the utility in using it if you want really loose, graphic images without a lot of detail. But it can be rather... frustrating to use. There may be cursing involved.

Proof that I can, in fact, pull a screen.
The end product wasn't completely professional looking, but I stand by my product. And the friend who received this particular present seemed happy enough with it, so mission success.
So now we begin the journey through the presents. I didn't record any of the flubs and mistakes I made along the way, but believe you me they exist.
The first present: a screen-printed T-shirt. Printing on black is the bane of my existence. But I did it and I'd do it again, but probably with more success and less frustration.
I drew an ice cream cone on tracing paper for my template.
Cute, isn't it? I think so. Simple, as well. Simplicity is what I like best in my art.
A shot of the screen after I had coated it with screen filler.
Screen filler, as I may have mentioned a few times, is not my favorite product. I can see the utility in using it if you want really loose, graphic images without a lot of detail. But it can be rather... frustrating to use. There may be cursing involved.
Proof that I can, in fact, pull a screen.
The end product wasn't completely professional looking, but I stand by my product. And the friend who received this particular present seemed happy enough with it, so mission success.
Subscribe to:
Posts (Atom)